
How to catch up with a blistering painting? This unsightly defect can ruin interior and exterior painting work. Discover the most common causes of the bulging of the paint and how to remedy it.
The importance of a perfect finish
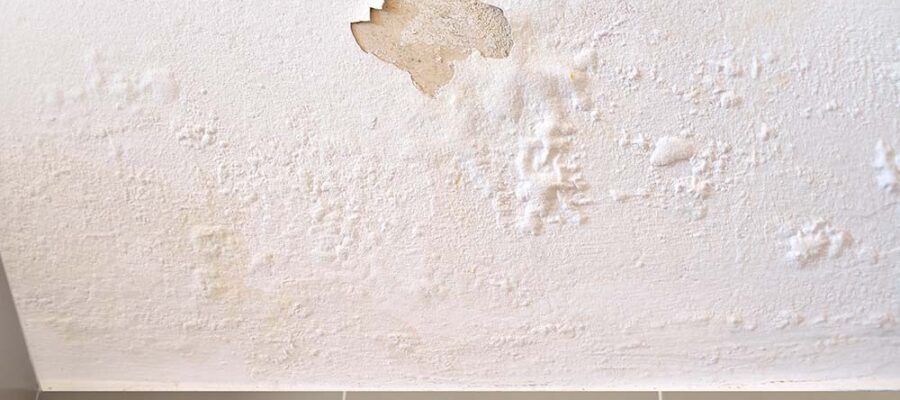
Nothing is as discouraging as to see blisters or paint bubbles on a freshly painted wall. After having invested time, energy and resources, this problem may seem insurmountable. Paint bubbles are however a frequent concern, often linked to errors in the preparation or application of the paint. This problem is solved, provided you tackle its deep causes. Without that, blisters will return, damaging your surface again. This detailed guide explains not only how to correct these imperfections, but also how to avoid them in your future projects.
What is the cause of bubbles or blisters of paint?
Poor adhesion to the support: the central problem
Bubbles or blisters appear mainly when the paint does not adhere properly to the surface. This defect is generally manifested when drying the paint, creating pockets of air or water under the paint film. These pockets can burst, leaving irregularities or scaled areas. In most cases, this is due to a poorly prepared surface or inadequate environmental conditions. A paint applied to a dirty, humid or greasy surface cannot hold properly. This is particularly common in areas subject to humidity, such as kitchens, bathrooms or basements.
The impact of humidity
Moisture is one of the main guilty of the bulge of the paint. A plumbing leakage, water infiltration, or an excess of ambient humidity can cause blisters. Identify and solve these underlying problems is essential to prevent the phenomenon from happening again. In very humid environments, the use of a dehumidifier or a paint specially formulated for these conditions can help prevent problems.
Drying temperature and conditions
Painting in extreme conditions, such as excessive heat or in full sun, can also be problematic. A paint that dries too quickly will tend to peel off in places, forming bubbles. It is crucial to paint in an environment whose temperature is stable and moderate, ideally between 15 ° C and 25 ° C, with moderate humidity.
The choice of tools: a detail that makes the difference
Another often neglected factor is the use of an unsuitable roller or brush. Each surface requires a specific tool:
-
- Short or foam rollers For smooth surfaces.
-
- Medium -haired rollers For slightly textured surfaces.
-
- Long hair rolls For rough surfaces.
A poor choice of tool can prevent a homogeneous application, resulting in the training of bubbles.
Importance of the underlay
An undercoat or «impression» is essential to promote adhesion and regulate the drying of painting. It makes it possible to fill the irregularities and ensures a sustainable finish. Without this stage, the risk of blisters increase considerably.
How to repair bubbles and blinks of paint?
Repairing bubbles or blisters in paint follows a process in several stages. Here is how to restore a smooth and aesthetic surface.
Step 1: Remove the damaged paint
Start by delicately scraping the wicked paint using a sealant knife. Work carefully so as not to damage the surrounding areas. If the blisters are located, you can limit your intervention to these specific areas. For extensive blisters, it may be necessary to treat the entire surface. Once the chipped paint is removed, inspect the surface to detect possible underlying problems, such as traces of humidity or cracks.
Step 2: Prepare the surface
Once the blisters are eliminated, apply a hooking underlay. This step is essential to standardize the surface and guarantee good adhesion of the paint. If holes or cracks are present, rebuild them with a smoothing coating. Let dry completely, then sand with a fine grain sandpaper to obtain a smooth finish. Apply a second layer of underlay if necessary. This will stabilize the support and avoid future problems.
Step 3: Apply the paint
After full drying of the underlay, you can repaint the surface. Use a quality paint and apply it in two thin layers, taking care to respect the drying times recommended by the manufacturer. For a perfect finish, choose the brush or the roll suitable for the type of surface and the paint used.
Tips to avoid bubbles and blisters in your future projects
-
- Clean and prepare the surfaces carefully Before painting.
-
- Use a suitable underlayespecially on porous or rough surfaces.
-
- Respect environmental conditions : moderate temperature, low humidity.
-
- Choose the appropriate tools depending on the surface.
-
- Apply the paint in thin and uniform layerswithout overloading the roll or the brush.
To go further:
Latest Posts Published

The assets of the ironwork style for your gate
What elements influence the price of fuel oil?

Yucca with drooping, yellow, dry, brown leaves at the end or that loses its leaves: what to do?
How to choose tiles that you will not tire

Debout, kitchen and dining table
The advantages of combined electricity and gas offers

When and how to plant an avocado in a pot: maintenance, watering, exposure, repotting

5 ideas for arranging the basement of a house

How to choose a floor wash robot
